Monday, March 26, 2012

Our Updated Outdoor Room

I can't believe that this is the first post I've written in 2012....ah well, been busy with the fam and just haven't had much time! I promise to do better and by that I mean I'll try to post at least once a month or whenever I'm feeling inspired!!

As the weather heats up, we've been spending much more time outdoors gearing up for the warmer months ahead. One of our biggest priorities was turning our ho-hum patio into the perfect retreat for my hubby & I. 

Here are a few BEFORE pics...

This is what we started with-Spring 2010

My wonderful hubby & a friend laid a paver patio


We threw a couple of spray painted Adirondack chairs & a firepit on the patio to make the space more useable-Summer 2011
And here's our newly updated Outdoor patio room...


A bit about the space.

Furniture: As tempting as it is to just go out and buy new stuff, it's always good to be thrifty and find ways to use and/or improve the furniture you already have. The teak chairs and a bench were purchased on Craigslist four years ago. Last summer I updated them with a fresh coat of Minwax wood protectant stain. The only other furniture we needed was a coffee table since we wanted to make this area more of a conversation area. We purchased this adorable Target Home Smithwick Metal Patio coffee table for $69.

Accessories: Our biggest addition (and splurge) for this space is the Allen + Roth Stone and Bronze Outdoor wood fireplace that we purchased at Lowes. Absolutely love it!! We wanted something a bit more dramatic than our old firepit and this was the perfect addition! At $249, we feel like it was a great deal. We certainly couldn't have built one for less than that.

We added new cushions and throw pillows to change up the look and make our seating more comfortable. The brown seat cushions are Smith & Hawken from Target ($16 each) and the striped throw pillows were purchased at Kohls (on sale and with coupons-of course)!

The animal print outdoor rug was purchased at Walmart a few years ago. It's been inside, but I decided it'd be fun to use it outside to anchor and add some extra flavor to the patio. I picked up the cute outdoor lanterns at TJ Maxx-$25 for the two.

So there you have it! We couldn't be happier with the additions we've made to our patio-it feels much more like an extension of the inside of our home and it's the perfect place to unwind with a magazine or a glass of wine!

Thanks for popping by! I'd love to hear your thoughts!!
Photobucket
I'm linking up to...

Wednesday, December 21, 2011

Our Holiday House Tour

It's no secret that I love decorating for different seasons and holidays-Christmas is no exception!! There's something so special and magical about this time of year.

Here's a quick tour of our Holiday Home!! Enjoy!!

We don't go all out with lights, but I couldn't resist these Evergreen wreaths!!

I layered a Country Star Welcome hanging with a sparkly wreath to add some color.

Excuse the cord-here's another Goodwill Holiday find that I couldn't pass up! Just a few bucks and it lights up at night!!

Upon entering our home-our stockings are hung on the staircase.
Each stocking is personalized with a picture-here's my cutie pie son!!

Found these brand new holiday pillows at Goodwill a few months ago! Love them!!
Here's the second Goodwill pillow-so cute!!
Our little entry Christmas tree-was decorated by our six-year old!!

The boys love watching the Polar Express train go around and around!!

"All Aboard!!!" this probably goes down as one of my son's fave Christmas gifts & has become a tradition!!

Had to Holiday-Up the guest bathroom!!


DIY DECOR-placed wrapping paper in a frame & added a yarn wreath with ornaments!!

Love the cottagey snowflake bath mat!! Gotta love Kohls!!

Our dining room tablescape! Table runner was from Hobby Lobby!

Our Guest Room
Matching kitchen towel from Hobby Lobby

More DIY Decor-our 24 days til Christmas Advent Calendar.

Close-up of the Advent Calendar!

Ornaments in a bowl add a festive touch to our kitchen table!!

It's been tough keeping our boys away from the Christmas tree!!

Another fun Holiday pillow!!

Had to Jimmy-up a tree topper! Mod Podged wrapping paper onto a paper cup and mounted a figurine on top!

My little guys can't wait to open these!!!

All of our ornaments are pretty special-I especially love adding pics and years so that we can see how much our boys change from year to year!

Love, love, love this handmade one!! So stinkin cute!!
Some night shots of the tree-love the way it reflects off the glass!!
Our tree truly lights up the room!! It's my fave place to sit with a hot cup of tea.....
Another view of our Christmas tree!!
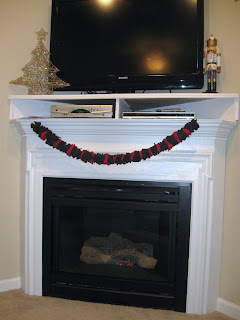
Simple DIY felt garland for the mantel! Nothing fancy!

Ornament clusters on the mirror!!

Found this awesome plate at a thrift store for a quarter-I've had it for 4 or 5 years now!! It's one of my faves!!
Copied this look after watching the Nate Berkus show!! So cute & easy peasy!!!

That's all folks! Thanks so much for popping by!
Hope that your holidays are filled with lots of love & laughter!!!

Photobucket

Sunday, December 4, 2011

DIY Decor: Easy Advent Calendar

I've seen tons of super cute advent calendars all over the place. Since I'm cheap thrifty, I decided to recreate my own.

Supplies used: blank art canvas, paint (spray paint works), matchbooks (24), scrapbooking paper, stickers, velcro & tape (glue or Mod Podge works too)

1) First step was to simply spray paint the canvas. I used Rustoleum's brown since it was already in my garage.

2) While the canvas is drying, it's time to work on whip out the matchbooks & scrapbook paper. Cut strips of the paper, wrap around each matchbook and seal the back with glue or tape.

3) Decorate the front of each wrapped matchbook with number stickers for each of the first 24 days of the month.

4) Once the canvas is dry-figure out how you want to arrange each the matchbooks ( I went for a Christmas tree design) and start applying the velcro tabs onto both the canvas & back of the matchbooks.

5) That's pretty much it-once it's complete you can insert small gifts or notes for every day leading up to Christmas! Today's special message revealed that we'd be having breakfast for dinner which is one of my oldest son's favorite things!!

Most of our advent days are filled with fun (and free) family activities like hopping in the car to check out Christmas lights, decorating cookies, making ornaments/crafts, watching Polar Express, reading a fun Christmas story, enjoying some hot cocoa (with extra whipped cream)....and the list goes on!!!

I'd love to hear your thoughts and/or fun ideas for Advent Calendar activities!!!

Thanks for popping by!!
Photobucket

Thursday, December 1, 2011

My So-Called Slipcover

PB's Holiday Anywhere Chairs
I've been obsessed with finding the perfect chair for my little guy's room. I wanted something cute and comfy-the perfect little chair for grabbing a book or just cuddling with one of his plushy, stuffed friends.

My first thought was to just splurge on a Pottery Barn Anywhere chair-aren't they the cutest?!

But then reality set in (in the form of a $100 plus price tag)! So I knew I had to find another option! Armed with my inspiration photo below-I was up for the challenge of re-creating this look for less!!

Pottery Barn Anywhere Chair

During a trip to Tuesday Morning, I spotted this adorable little chair. Well let's be honest....it really wasn't so adorable at first glance. The animal print is just a wee bit much for my taste-but the chair had potential. Super comfy, well made, plus it's a combo chair/rocker-adorable. It was on Clearance for just $35 plus an additional 50% off-so I scored it for $17.
I found the perfect blue twill fabric at Garden Ridge. Also on Clearance-25 cents for 2 yards!!! I grabbed every decent fabric they had and still managed to spend just under $2. Amazing!!


Here it is! My so-called slipcover!

After perusing the web for slipcover tutorials, I stumbled upon the perfect one-The Laziest Slipcover Tutorial Ever-over at Pink & Polka Dot.

This was my very first slipcover and despite most blogs making it look oh so easy-it was a lot of work and it didn't turn out as perfectly as I'd hoped.

I was actually a bit disappointed with how mine turned out, but my disappointment faded when my little guy jumped into his cool new chair the next morning!! He was sooo excited!! 

He likes it, he really likes it!!!

His Monkeys are loving his new chair too!

I honestly thought long and hard before writing this post because often times when you look at blogs people write about their triumphs versus their attempts. You generally see perfectly decorated spaces or beautifully crafted projects.

My main reason for sharing is because I think so many of us Moms can agree that we try so hard to be perfect when the quest for perfection only sets us up for disappointments. Believe it or not, kids don't need much and they definitely aren't judging us as hard as we tend to judge ourselves. The look on my son's face when he saw his new chair was just priceless. He didn't notice the flaws-he was just HAPPY!!

I'd love to hear your thoughts and stories about projects gone wrong or parenting general!!

Thanks for popping by!
Photobucket
I'm linking up to...

Transformation Thursday